FIELD GUIDE / PUZZLES
CONTROL Resonant Laundry Puzzle: The Washing Machine Solution
The laundry puzzle in Central is solved by switching on six machines, across seven rows, to match the note titled “While You Wait.” The three rows on the right island and rear right wall stay completely off. Once the pattern is correct, the wall in…
The laundry puzzle in Central is solved by switching on six machines, across seven rows, to match the note titled “While You Wait.” The three rows on the right island and rear right wall stay completely off. Once the pattern is correct, the wall in the back break room opens on its own; the basement contains a Health Upgrade Point and counts as a Secret Hideout.
The laundry puzzle in Central is solved by switching on six machines, across seven rows, to match the note titled “While You Wait.” The three rows on the right island and rear right wall stay completely off. Once the pattern is correct, the wall in the back break room opens on its own; the basement contains a Health Upgrade Point and counts as a Secret Hideout.
Find Wear 'Em & Wash 'Em and get inside
Look for the blue Wear 'Em & Wash 'Em storefront in Central, near East Park Station. The map below shows the location recorded in the supplied Insider Gaming material. If the entrance is blocked by floating debris, follow each red corruption trail away from the door and destroy the growth at its end. Clearing all three growths removes the barrier. This is an exploration secret rather than a required story mission, so returning later with a stronger build is fine.
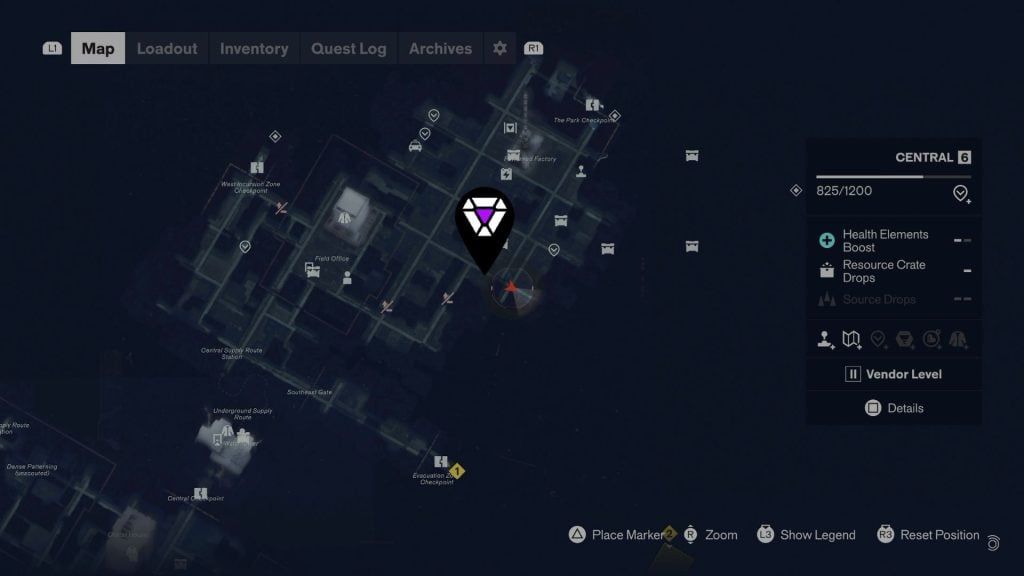
Source image: Insider Gaming's laundry guide.
Inside, find the “While You Wait” note on the rear corkboard. It contains seven lines of zeroes and ones. The room also has a customer complaint hinting that not every machine works. The broken machines still occupy positions in the code, even though they cannot be switched on.
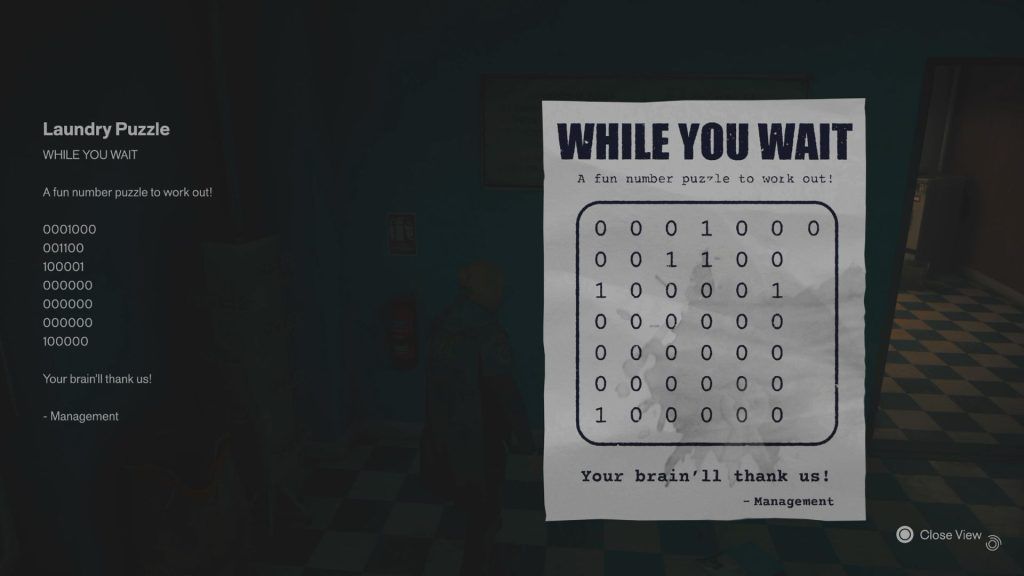
Source image: Insider Gaming's laundry guide.
The seven-row solution
Face into the shop from the main entrance. Begin with the left wall, then count both faces of the left island, both faces of the right island, and finally the two sections of the right wall. A pair of stacked drums counts as one horizontal position. The note reads:
| Row | Where to stand and look | Code | Machines to leave on |
|---|---|---|---|
| 1 | Left exterior wall | 0001000 |
The middle machine |
| 2 | Left island, facing the left wall | 001100 |
The two middle machines |
| 3 | Left island, facing the center aisle | 100001 |
The machine at each end |
| 4 | Right island, facing the center aisle | 000000 |
None |
| 5 | Right island, facing the right wall | 000000 |
None |
| 6 | Rear section of the right wall, near the break room | 000000 |
None |
| 7 | Front section of the right wall, near the entrance | 100000 |
The machine beside the divider pillar |
The last row causes the most confusion. Its “first” machine is the one touching the concrete pillar that divides the two right-wall sections, not the machine nearest the front door. The layout matters more than the direction you happen to face while walking through the store.
There are six active machines in total: one in row 1, two in row 2, two in row 3, and one in row 7. Some source articles say seven machines must be active because the note has seven rows. The visible code and the row-by-row solution show six 1 values, so the six-machine count is the usable one.
Open the hideout and take the reward
After the sixth correct machine is on, listen for the confirmation chime and go to the break room at the back. Its wall slides open automatically. There is no master lever. Descend the stairs and open the Third Ice chest for a Health Upgrade Point. A Health Upgrade Point is progress toward a maximum-health increase; whether this particular chest completes a set depends on what your save has already collected.
The basement also contains shelter files and is one of the Secret Hideouts relevant to the Backroom Espionage trophy. The trophy roadmap explains how to schedule those cleanup tasks with the rest of a completion run.
If the wall stays closed
First check rows 4, 5, and 6. Every machine in those rows must be off, including any that was running when you arrived. Next verify row 7 at the divider pillar. Finally count the broken “Out of Order” units as positions rather than skipping them, and look at the machines' power indicators instead of the room's ambient lighting. Toggle any incorrect unit once and allow a moment for the state change to register.
If you are exploring Central for other short puzzles, The Last Taxi explains the nearby taxi's light clues. Return to the CONTROL Resonant guide hub for quest, combat, and collectible routes.
Sources and notes
Game details are based on the linked guides and supplied research. They have not all been independently tested in game.